Sometimes all you want is your data off your computer instead of fixing it. I get it. Some repairs are just too costly or maybe you were just ready for a new computer anyway. No matter the circumstances, data recovery (when the drive is working) is actually quite straightforward. You’ll just need a few tools and an adapter.
In this post, we’ll go through (at a high level) disassembling your computer (desktop or laptop), locating the hard drive or solid state drive, and getting it connected to another computer for data copying.
The goal is help you learn basic data recovery without having to hand-off your computer to someone else (especially during COVID-19 times). As always, we are here to help if you get stuck or decide the process is just too much to handle. You can always request a quote at: https://www.marptech.com/contact
Disassembling your computer
Helpful Tools:
- iFixit Screwdriver Set (Or any small multi-bit screwdriver set)
- iFixit Prying/Opening Tools (Or any standard plastic spudger)
You will need to start by opening your laptop or desktop. Many name-brand computers have easy to follow disassembly guides already posted to the internet. A quick Youtube search is usually sufficient like “HP ENVY x360 Teardown” or “Dell Inspiron 15 Disassembly”. It does not need to be your exact model for you to get the general idea.
Even though this sounds daunting - Just remember, we are only trying to expose the internals. Most hard drive/solid state drives are easily accessible once the side-panel or backing is removed from your computer.
Here’s a quick set of steps that will work in MOST cases. If my generic steps do not seem to make sense for your computer, I highly suggest seeking out a disassembly video on Youtube or getting in touch with us for tips.
For laptops:
Identify all screws on the underside of the laptop (beware some screws may be hidden under rubber feet or strips)
Unscrew all screws and keep them organized for re-assembling the computer
With a plastic pry tool, attempt to separate the bottom-half of the laptop from the upper-half (the piece that usually contains the keyboard)
On some laptops, you will need to remove the keyboard first to expose extra screws that are holding the upper and lower assemblies together
For desktops:
- Unscrew one or two screws from the back of the case on side panel
- Pull the side panel off to expose the inside of the desktop
If these general steps don’t seem to work for your situation, it is suggested you seek out a disassembly guide or video.
Identifying your drive
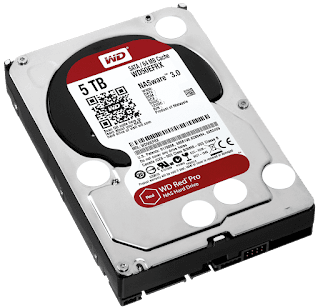
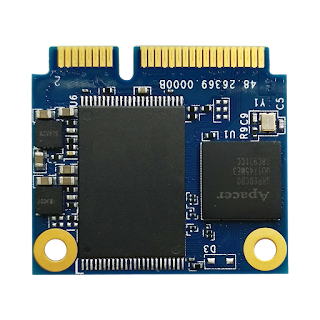
Your computer could have many, many different types of drives that house your personal data. Different types of computers typically use different types of storage technology for space reasons or for performance. Shown below are the likely different types of drives you may encounter when disassembling your computer. It’s important to know the type of drive your computer has so that you can determine the type of adapter you need to purchase to connect it to another computer. Use the pictures to help you determine what you are working with.
In all cases, usually one to four screws are holding the drive into the computer. Remove these and gently remove the drive from the computer. Some drives will be connected by SATA cables, just pull these out. Other drives will look like microchips, and these will just cleanly remove from the slot they are installed in with a little bit of a force (truly, just a little - If you feel like you’re pulling too hard, something is likely still screwed in!).
Feel like none of the pictures match what you’re dealing with? You can always Google search the model number of the drive (on the sticker/printed on the outside) to determine what it is.
Desktop Hard Drive (3.5" HDD)
Laptop Hard Drive (2.5" HDD)
2.5" Solid State Drive
M.2 Solid State Drive
mSATA Solid State Drive
Connecting Your Drive to Another Computer
Now that you have identified your drive and removed it from the non-functioning computer, we need to get it connected to a secondary PC to copy the files. Each drive type (as identified above) will need a specific adapter in order to connect it to a secondary PC. I will be including links to adapters you can purchase for each specific drive type.
Desktop Hard Drive
Adapters:
- Desktop HDD to USB Adapter (What matters is that it is externally powered)
Laptop Hard Drive / 2.5" Solid State Drive
Adapters:
- USB to SATA Adapter (Not powered)
M.2 Solid State Drive
These drives are a little tricky! There are two types of M.2 Solid State Drives, M.2 SATA SSDs and NMVe SSDs. The easiest solution is to lookup the model number listed on the M.2 SSD and determine if it is listed as a SATA or NVMe SSD. I know this is subjective, so I will include two examples below to assist. In general, if the device does not list that is uses an NVMe interface, you can assume it is a M.2 SATA SSD.
Example M.2 SATA SSD:
Example M.2 NVMe SSD:
Adapters:
mSATA Solid State Drive
Adapters:
Connecting Everything Up
Hopefully by this point, you have identified the adapter needed for your situation, purchased it, and everything has arrived. For the most part, connecting the drive into the adapter should be straightforward. Each adapter should have a brief manual on how to connect it up if you get stuck.
Backing Your Items Up
At this point, you should be able to connect your drive (with adapter) to your other computer. The drive should automatically mount in Windows or Mac.
You can now view your files in your file viewer of choice. You can copy your files to an external USB drive or to an external hard drive. In cases where you plan on purchasing a new computer, you can connect the drive and adapter to the new computer and directly transfer the files.
Summary/Quick Version
Quick Guide
Consider this your TL;DR version of the above. I suggest using the longer portions above if you need more details or links to purchase items.
Disassemble your computer enough to locate the hard drive or solid state drive
When in doubt, lookup a disassembly guide on YouTube or direct from the manufacturer (HP typically provides teardown guides via support PDFs)
Identify the type of hard drive/solid state drive your computer uses
Purchase the appropriate adapter to convert your drive to a USB connection
Connect your drive plus adapter to a second computer to view/copy the files off
Wrap Up
Thanks for reading this far. I hope this guide helped you get an idea of how to do basic data recovery on your own. If you get stuck, feel free to reach out to us directly, and we’ll be happy to help at: https://www.marptech.com/contact
Note: Links provided may provide us with revenue (if you order something). We use this to continue to provide you content and keep our business afloat. Thank you!
See also
- Computer Repairs You Can Solve On Your Own - Social Distancing/COVID Compliant
- Migrating Your Computer from a HDD to a SSD
- Tech Tips: Securely Factory Restore Windows 10
- Tools: Creating a USB Utility Drive (AV/Memory Testing, HDD Testing, and More)
- Tools: Creating a Windows 10 USB Install Drive (For Backups and Re-Install Needs)


